
Managing inventory counts is essential for maintaining accurate stock levels in your store. This guide explains how to perform different types of inventory counts using the SSMS front-end application. You'll learn to create, execute, and confirm inventory counts for specific locations or products.
Access to inventory counts
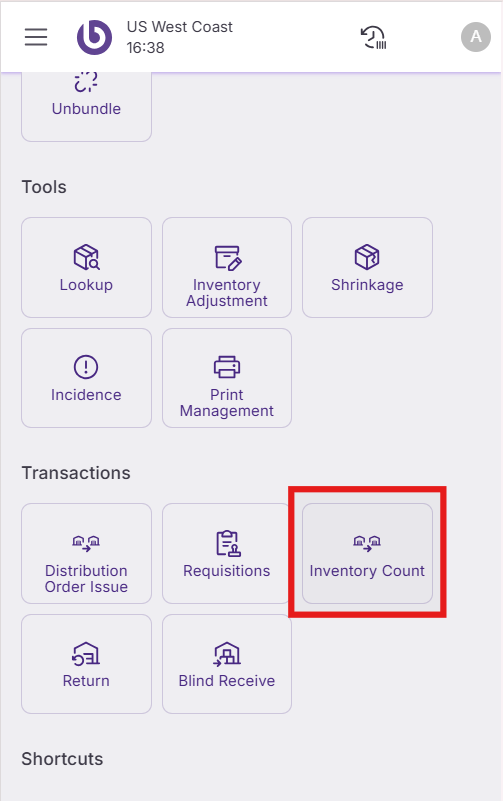
Open the SSMS application on your mobile device. Navigate to the 'Transactions' section and select 'Inventory count'.
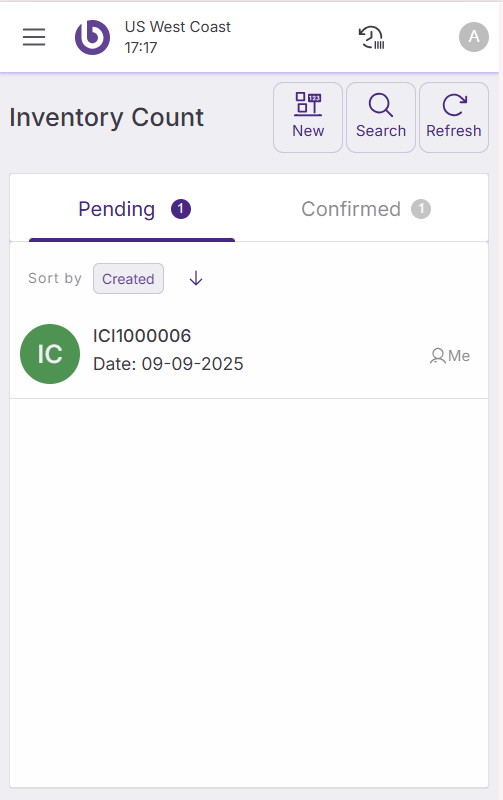
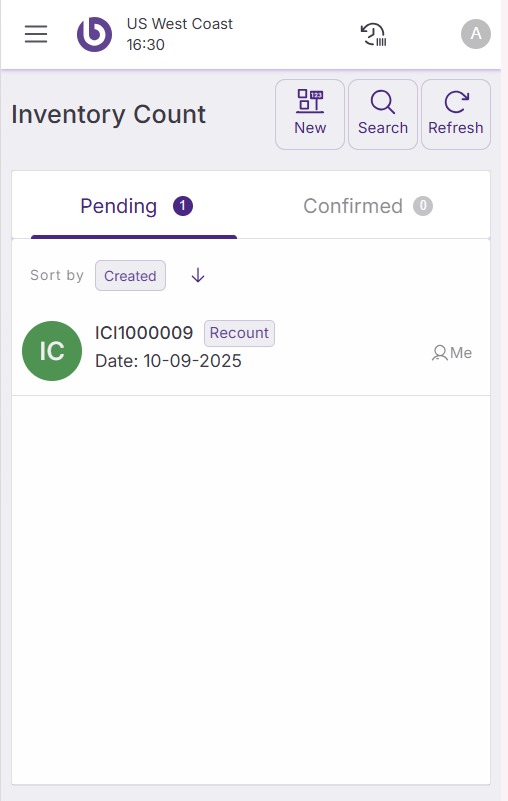
The ‘Inventory Count’ screen displays two main sections:
-
Pending: Shows inventory transactions waiting for confirmation.
-
Confirmed: Shows completed inventory counts.
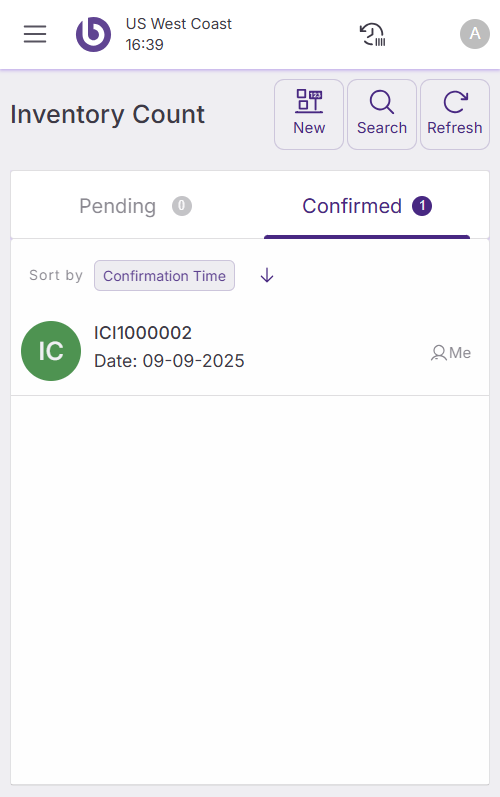
Use the ‘Search’ button to filter pending or confirmed inventory counts by document number.
The ‘Refresh’ button updates the list to show recently assigned inventory tasks in real-time.
The ‘New Count’ button allows you to create a new inventory count.
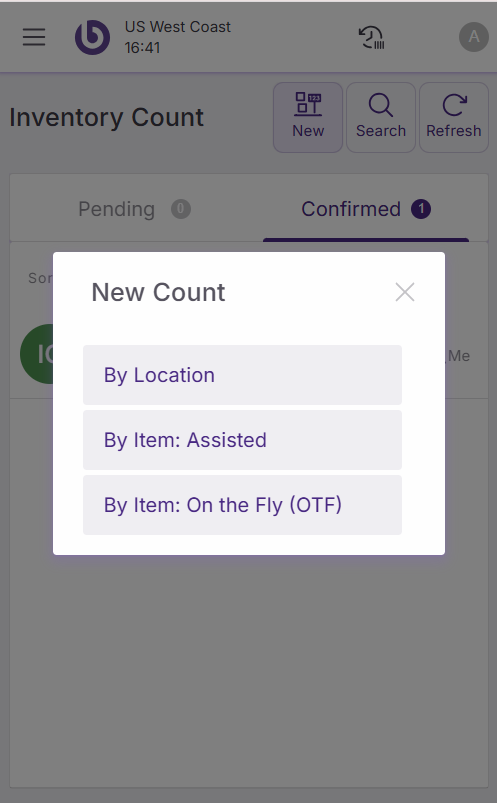
The user can select between three types of inventory count:
-
By Location to perform a guided inventory count for a designated full bin or set of bins, without concern for the specific types of products contained, to maintain accurate and current records in the system.
-
By Item Assisted to perform a guided inventory count for a specific product or a range of products within a designated bin or set of bins (or in the full warehouse), so that the user can update the records of the system with the exact number of these items in the bins where she/he checked.
-
By Item: On the Fly (OTF) to perform a quick inventory count for one or several products. For example, the warehouse operator has just detected some products broken on a shelf and wants a quick update of the stock with the remaining (non-broken) ones.
Inventory count by location
Create a new inventory count by location
This method allows you to count all products within specific storage areas without focusing on individual product types.
Tap 'New count' and select 'By Location'. The system opens the new count creation screen with these fields:
Basic information:
-
Creation date: Automatically filled with today's date.
-
Description: Enter a descriptive name.
-
Assign to: Select which users will perform this count. You're assigned by default. If multiple users work on the same inventory count, the stock level will be updated with the combined sum of all the counts made by each user.
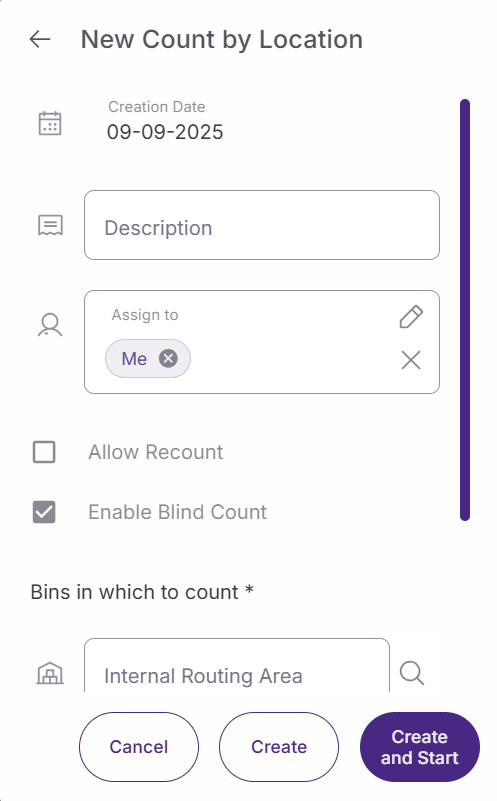
Count options:
-
Allow recount: Enable this to perform a second count for items with quantity differences. Only available when multiple users are assigned.
-
Enable blind count: Uncheck this option to see expected quantities while counting. Blind inventory counts can always be enforced through backend configuration.
-
Initialize quantity count with book quantity: Check this to pre-fill counted quantities with expected amounts.
Location selection:
Choose at least one location type where counting will occur:
-
Internal Routing Area: Select specific routing areas.
-
Storage Bin Group: Choose bin groups.
-
Storage Bin: Pick individual bins.
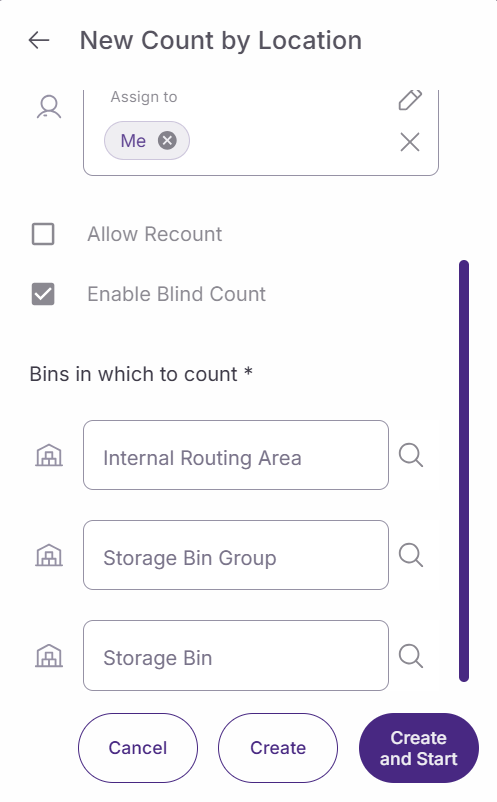
Tap ‘Create’ to save the count or ‘Create and start’ to begin immediately.
The system prevents creation if no locations are selected.
Click ‘Cancel’ to return to the ‘Inventory Count’ screen.
Perform an inventory count by location
Once you start an inventory count by location, products appear with their expected quantities if you enabled the book quantity option or with zero quantity if it is a blind count.

In the blind count case, the user must count the products by scanning or manually increasing the quantity.
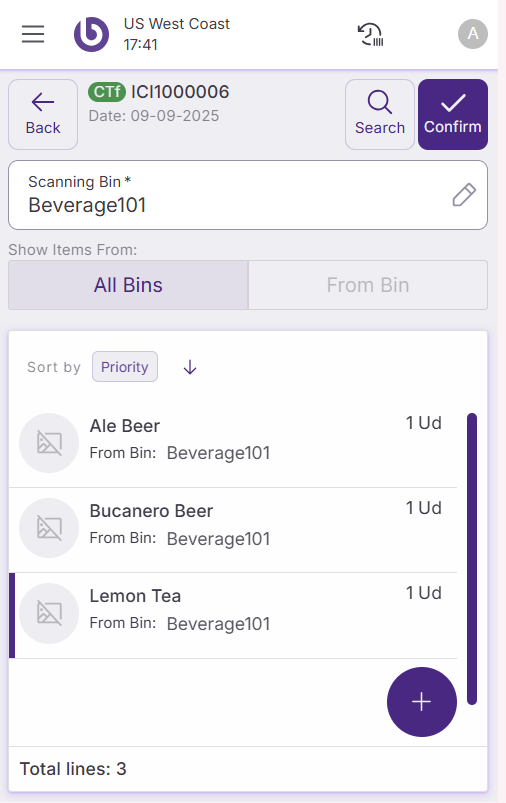
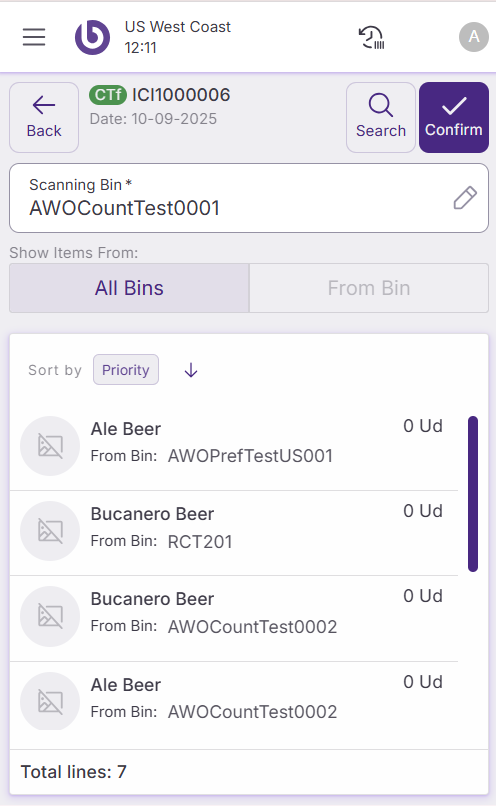
To count using scanners:
-
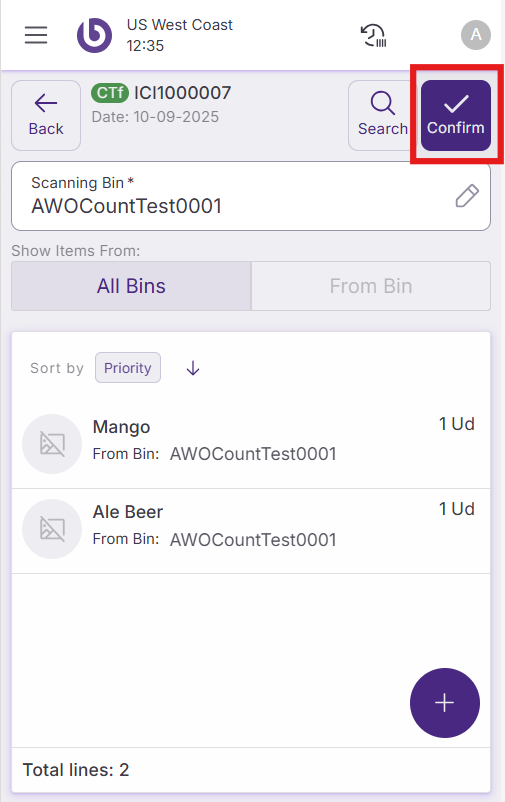
Select or scan the bin using the ‘Scanning bin’ field.
-
Scan products to increase quantities automatically.
To count manually:
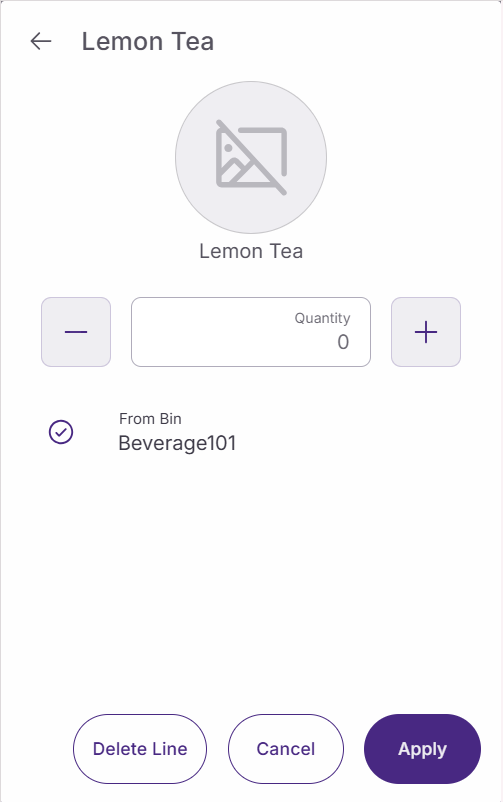
-
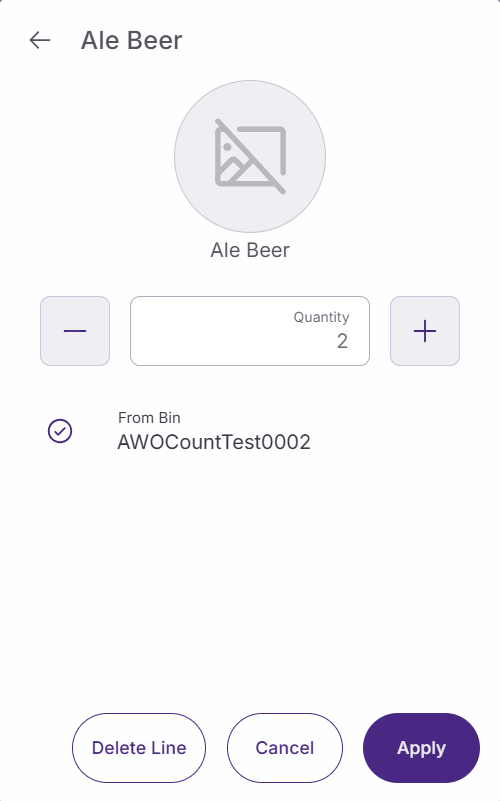
Click on the product to open the item screen.
-
Tap the plus button next to each product to increase quantities.
-
Use the minus button to decrease quantities.
After that, you can take the following actions:
-
Tap the ‘Delete Line’ button to remove a product line.
-
Click the ‘Cancel’ button to return to the Inventory Count screen.
-
Tap the ‘Apply’ button to update the counted quantity.
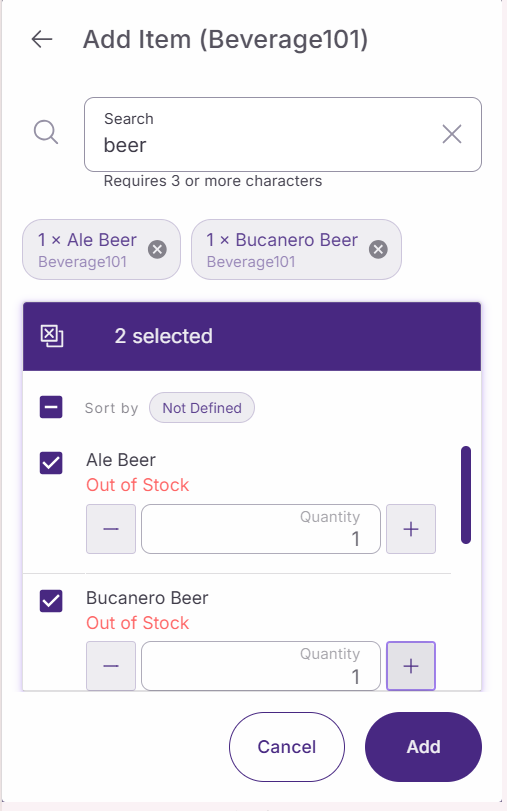
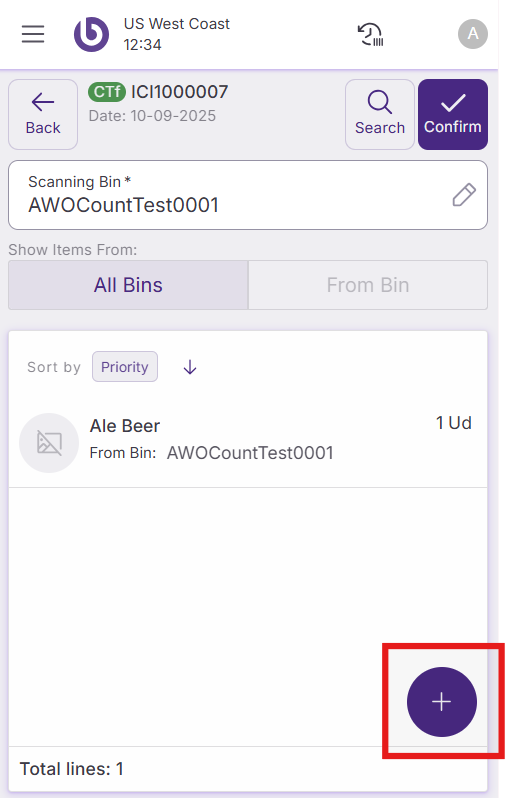
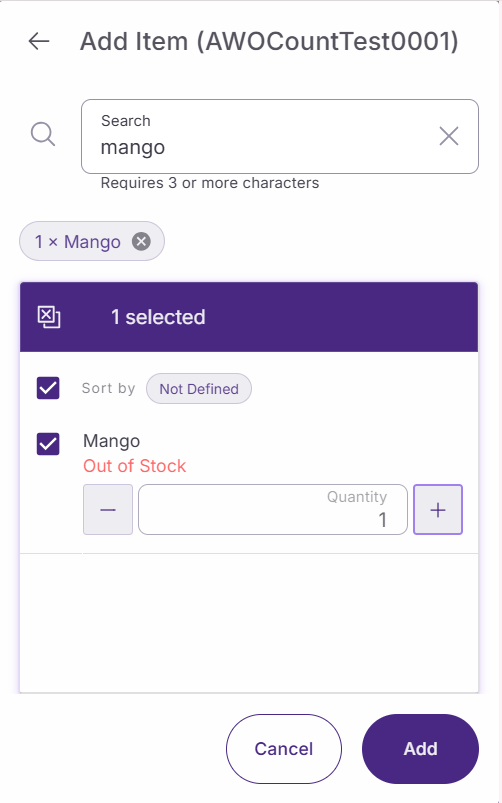
You can manually add new products to the inventory count by tapping the plus button.
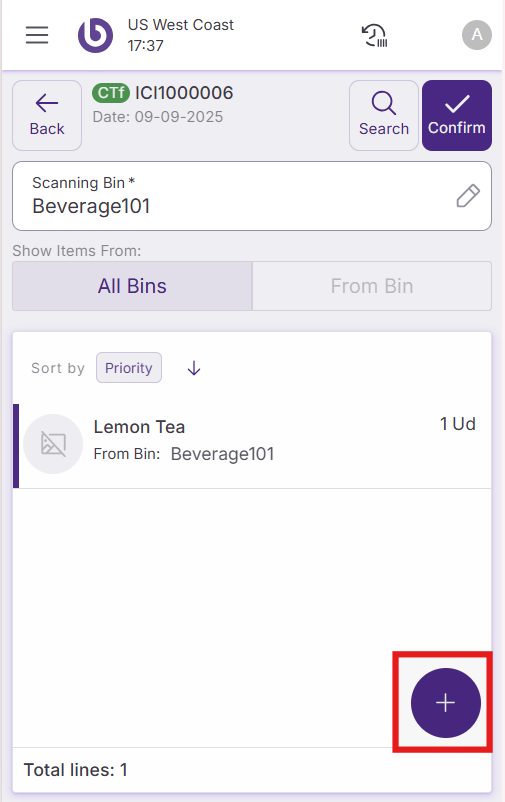
The ‘Add Item’ screen is open when the user can search and select multiple products.
Once all the products included in the Inventory Count are counted, tap the ‘Confirm’ button to update stock levels. The inventory count will be moved to the 'Confirmed' section.
You can verify the new stock amounts using the lookup tool.
Inventory count by item
Create a new inventory count by item
This method lets you count specific products within designated locations or across the entire warehouse
Tap 'New count' and select 'By Item: Assisted'. Complete the same basic information fields as in an inventory count by location.
Basic information:
-
Creation date: Automatically filled with today's date.
-
Description: Enter a descriptive name.
-
Assign to: Select which users will perform this count. You're assigned by default. If multiple users work on the same inventory count, the stock level will be updated with the combined sum of all the counts made by each user.

Count options:
-
Allow recount: Enable this to perform a second count for items with quantity differences. Only available when multiple users are assigned.
-
Enable blind count: Uncheck this option to see expected quantities while counting. Blind Inventory Counts can always be enforced through backend configuration.
-
Initialize quantity count with book quantity: Check this to pre-fill counted quantities with expected amounts.
Items to be counted:
For the inventory count by item, you must select products to count using at least one of the following filters:
-
Item: Choose specific products.
-
Item Category: Select entire product categories.
-
Handling Unit: Include handling units in the count.
-
Item Qty: Set quantity conditions to filter products.
The system requires at least one item selection before allowing count creation.
All filters support multiple selections and work together to define your count scope.
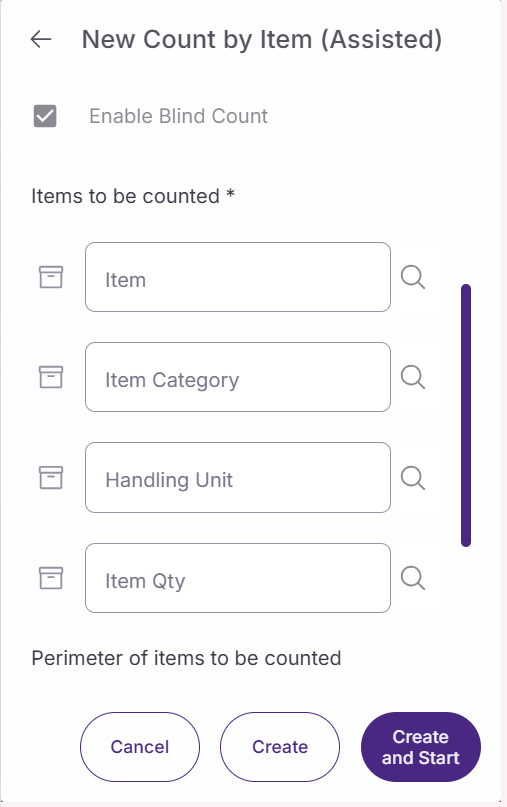
Perimeter of items to be counted:
Unlike the inventory count by location, select a designated location is optional. You can limit where selected items should be counted by choosing:
-
Internal Routing Area: Select specific routing areas.
-
Storage Bin Group: Choose bin groups.
-
Storage Bin: Pick individual bins.

Perform an inventory count by item
Once you start an inventory count by item, products appear with their expected quantities if you enabled the book quantity option or with zero quantity if it is a blind count.
In the blind count case or to adjust the book quantity, the user must count the products by scanning or manually increasing the quantity.
To count using scanners:
-
Select or scan the bin using the ‘Scanning bin’ field.
-
Scan products to increase quantities automatically.
To count manually:
-
Click on the product to open the item screen.
-
Tap the plus button next to each product to increase quantities.
-
Use the minus button to decrease quantities.
After that, you can take the following actions:
-
Tap the ‘Delete Line’ button to remove a product line.
-
Click the ‘Cancel’ button to return to the Inventory Count screen.
-
Tap the ‘Apply’ button to update the counted quantity.
Once all the products included in the inventory count are counted, tap the ‘Confirm’ button to update stock levels. The inventory count is moved to the 'Confirmed' section.
You can verify the new stock amounts using the lookup tool.
Inventory count by item: On the fly (OTF)
Create a new inventory count by item: On the fly (OTF)
Use this method for quick inventory updates when you know exactly what needs counting right now, such as after discovering damaged products.
Tap 'New count' and select 'By Item: On The Fly(OTF)'. The form includes the same item and location selection options as assisted counts, but all fields are optional. You can create the count without any predefined scope.
Basic information:
-
Creation date: Automatically filled with today's date.
-
Description: Enter a descriptive name.
-
Assign to: Select which users will perform this count. You're assigned by default. If multiple users work on the same inventory count, the stock level will be updated with the combined sum of all the counts made by each user.

Count options:
-
Allow recount: Enable this to perform a second count for items with quantity differences. Only available when multiple users are assigned.
-
Enable blind count: Uncheck this option to see expected quantities while counting. Blind Inventory Counts can always be enforced through backend configuration.
-
Initialize quantity count with book quantity: Check this to pre-fill counted quantities with expected amounts.
Perimeter:
All perimeter parameters are optional.
-
Item: Select specific products for counting.
-
Item category: Include entire product categories.
-
Handling units: Add handling units to the count scope.
-
Item Qty: Set quantity-based conditions to filter products.
-
Internal routing area: Select specific routing areas.
-
Storage bin group: Choose bin groups.
-
Storage bin: Pick individual bins.
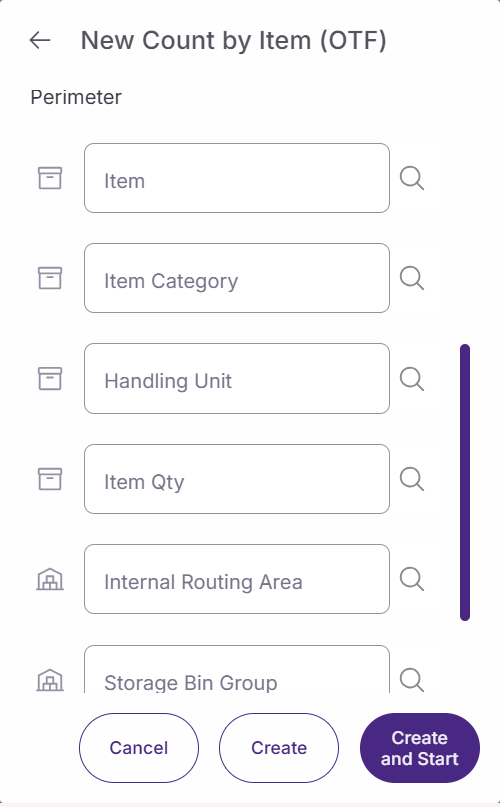
Tap ‘Create’ to save the count or ‘Create and start’ to begin immediately.
Click ‘Cancel’ to return to the ‘Inventory Count’ screen.
Perform an inventory count by item: On the fly (OTF)
To perform an inventory count by item on the fly (OTF), follow these steps:
-
Select or scan a bin using the bin selector.
-
Choose products either by scanning or using the product selector, plus button.
-
Enter the actual counted quantities.
-
Move to additional bins as needed.
-
Repeat the process for all required items and locations.
Tap ‘Confirm’ to finalize the count and update inventory levels.
Work with shared counts
Shared counts allow multiple team members to work on the same inventory task. When assigned to a shared count, firstly, follow the same counting procedures explaining in the previous sections.
If recount is enabled and quantity differences are found, once all involved users confirm the inventory count, a recount task verifies accuracy for products with discrepancies and only for the user who counted them.
Depending on the warehouse backend configuration, after users confirm the recount, an additional count task may be generated in the ‘Stock Operations’ section ‘Count’ for the manager to verify the differences.
Once all the users confirm the recount, and the manager verifies the differences if applicable, the stock level is updated.
Action availability and access control
The actions and options shown in the ‘New Count’ dialog are role-dependent. By default, if a user does not have permission for a specific action, it will not appear in the interface.
This behavior can be overridden per warehouse by defining a custom UI configuration in the ‘Warehouse Definition’ window.
For more details on how access is configured, see the Role and user action setup in SSMS section.
|
Option |
User action |
|---|---|
|
By Location |
OpenNewLocationCountDialog |
|
By Item: Assisted |
OpenNewAssistedCountDialog |
|
By Item: On the Fly (OTF) |
OpenNewOTFCountDialog |